Contents
How to use Wekinator: Step by step
1. Setting up communication between inputs, outputs, and Wekinator
Wekinator uses OpenSoundControl to communicate. Each OpenSoundControl message has:
- A destination, which includes:
a hostname (i.e., a computer name; use localhost if you’re just running on your own computer)
a port number (e.g., 6448) - A message name, which is a text string identifying the message (e.g., /wek/inputs)
- Message data
For Wekinator, this is typically a set of numbers, sent as floats.
When you start Wekinator, the first interface (below) will ask you for the information it needs to set up communication:
- The port number your inputs are being sent to (a)
- The message name you’re using to send inputs (b)
- The number of inputs (c)
- The message name to use for sending outputs (d)
- The number of outputs (e)
- The host name and port number to send outputs to (f, g)
- The type of each output (read about output types below) (h)

![]()
2. Choose and run your input and output applications
You can download examples of inputs and outputs for your operating system at the Downloads page. They all use default port and message names, so you’ll need to just look at the filenames and tell Wekinator to use:
- the number of inputs (e.g., Simple_MouseXY_2Inputs sends 2 inputs)
- the number and type of outputs
e.g., Processing_2ContinuousOutputs sends 2 continuous outputs;
for the downloadable examples, outputs are either “all continuous” or “all classifiers” - the number of classes (categories) for any classifier type outputs
Run your chosen input and output applications before continuing. Be careful: Don’t ever run more than one input or more than one output at once (until you understand how to change the OSC settings): this will result in strange (or no) behavior!
3. Record some training examples
Hit “Next >” on the project setup screen if you haven’t already, to get to the main screen.
In this section we’ll be focusing on how to use this screen for classification or numeric outputs; for dynamic time warping outputs, see belowTODO

i. Use the sliders, text boxes, and/or the “Randomize” button on the right side of the screen to set the output values to something you like.
ii. Generate the input that you think should result in that output (e.g., by moving in front of your motion sensor, moving your game controller, etc.)
iii. Hit “Start Recording” on the left, then “Stop Recording.”
- You should see that some training examples were recorded for each model (the number next to the “X” button in each model row, TODO in the figure above).
- If examples aren’t recorded, see Troubleshooting below
iv. Repeat steps i, ii, and iii for at least one other type of output & input.
4. Train
Hit the “Train” button on the left to train your models. You will see the training indicators (g) turn green when training is done.
5. Run
Hit the “Run” button on the left to run your trained models. When each input message arrives, Wekinator will use the trained models to compute all output values, then it will send an output message via OSC. You will also be able to see the values change on the screen. If you don’t see any changes in your outputs as your input changes, see Troubleshooting below.
6. Have fun!
You can now:
- Add examples to your training set by repeating steps 3 & 4 (Recording & Training) above, then run again to see how your models changed.
- Delete the last recording and retrain your models to undo those changes if you didn’t like them
- Delete all examples for a model ((c) above) if it’s not behaving how you want
- Delete all examples for all models if you want to start over completely (using the “X” button above the model rows)
- View your training examples to troubleshoot (using the magnifying glass above the model rows)
- Change the output type or algorithm type by clicking the “edit” button for a model ((f) above)
You can also save your project at any time and reload it from the File menu. You don’t need to re-train each time you open Wekinator.
Understanding Wekinator’s output types
The three output types
Wekinator has three main output types:
1) Classification outputs: These are discrete categories, such as “Position 1”, “Position 2,” “Position 3.” You’ll need to tell Wekinator how many categories to use. Wekinator will send outputs as numbers, such as “1,” “2,” “3” for categories 1, 2, and 3. Wekinator will attempt to categorize every new input you send it.
2) Numeric outputs: These are numeric values. There are two types of numeric outputs:
- Real-valued (“continuous”) numeric outputs can take on any number value (possibly limited to a certain range). For example, you might want to control “audio gain” with a real-valued output limited between 0 and 1. This is the default output type in Wekinator.
- Integer-valued numeric outputs can take on any integer value (possibly limited to a certain range). For example, you might want to control “MIDI pitch” with an integer-valued output between 0 and 127.
3) Dynamic time warping event outputs: Use this output type when you want Wekinator to recognize patterns over time. For instance, you might want to play one note every time you draw a circle in the air with your hand, and another note every time you draw a square. If you’re not drawing either one, or if you’re in the middle of drawing, you don’t want anything to happen. That is, you want Wekinator to look for a particular pattern (or multiple patterns) of how the inputs are changing over time, and tell you when a pattern is spotted and which one it was.
Wekinator sends different output messages for different output types
When Wekinator builds numeric or classification models, it computes a set of output values every time it sees a new input, and it sends all the output values out via OSC as fast as it can, using a single message (named /wek/outputs, by default).
When Wekinator builds a dynamic time warping model, it continually looks at the input to see how closely the current “shape” of the input (the current input value and the recent input values) matches each of the example shapes you’ve shown it during training. If the closest example is closer than your threshold distance, Wekinator outputs a message corresponding to that closest example. See below for instructions on how to customize that message name. Wekinator also outputs the set of match distances for each gesture class every time a new input is received, using the project-side OSC output message (/wek/outputs, by default).
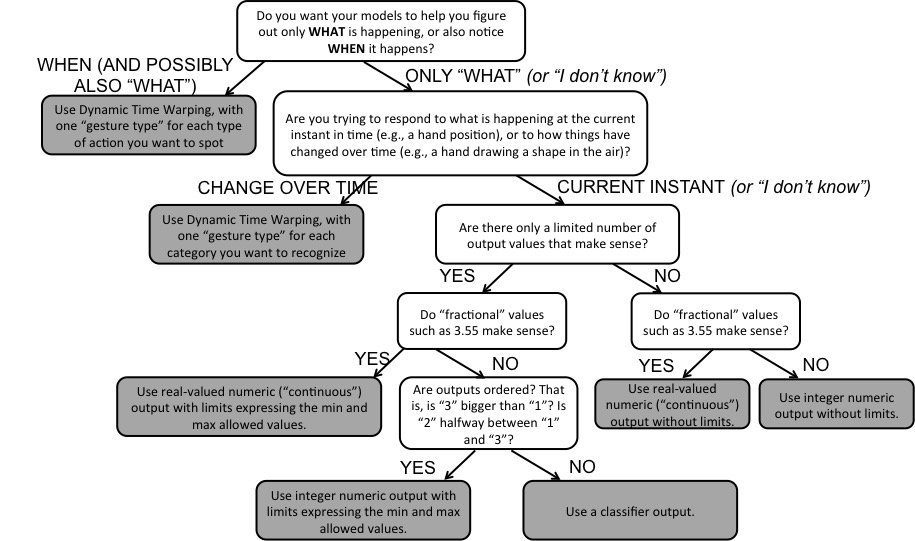
Choosing an output type
Use the following diagram if you’re not sure what output type to use:
Dynamic time warping in Wekinator
The basics
To use dynamic time warping, you’ll follow a slightly different process from the one described in the instructions above.
A training “example” in dynamic time warping captures how your inputs have changed over a period of time. For instance, you might want to use DTW to recognize different shapes drawn with your hand, if you’re using an input feature extractor that sends the (x,y) position of your hand at each point in time. An example would therefore be a list of (x,y) values that describe the position of your hand from the time you start drawing a shape until you finish drawing it.
To record an example for DTW, hold down the “+” button as soon as you start making the gesture (or sound, etc.) and release it only when you finish making the gesture. If you made a mistake, you can always delete the last example recorded by hitting the “-” button:

DTW only needs one training example of any gesture class to be recorded before it can run. There is no separate training stage.
Once you start Running, you’ll see a blue bar showing you the degree of similarity between the current gesture you are making and the closest example you’ve recorded for each gesture type. The further to the right this bar, the closer the match. When the similarity of the closest match is above your set threshold, the light for that gesture will turn green, and the OSC message corresponding to that gesture type will be sent out. You can tune the match threshold interactively using the slider at the bottom of the screen:

This range of this slider is different from the range of each of the blue bars, so it may be that your closest match is above the numeric threshold even though your slider is to the right of the degree of match, like in the picture above. This is fine! Just experiment with the slider until it seems like the green light goes of when you make the gesture and doesn’t go off when you don’t make the gesture.
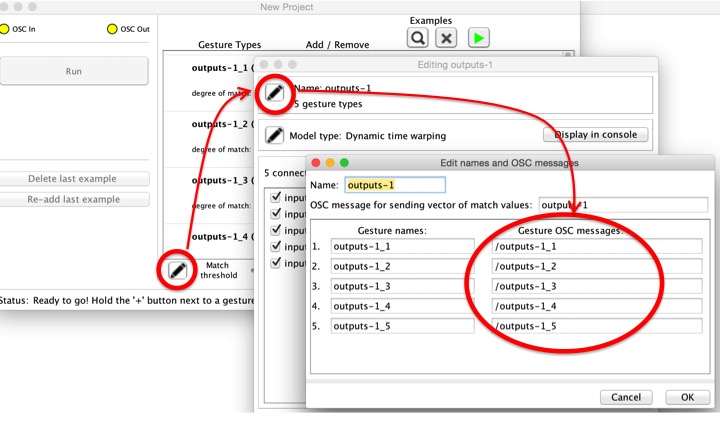
Customizing OSC messages
By default, these message names that will be sent when the gestures are matched (i.e., green light turns on) are /outputs_1, /outputs_2, and so on. You can customize these message names by hitting the “edit” button at the bottom of the main Dynamic Time Warping screen, then hitting the “edit” button for the output group name:
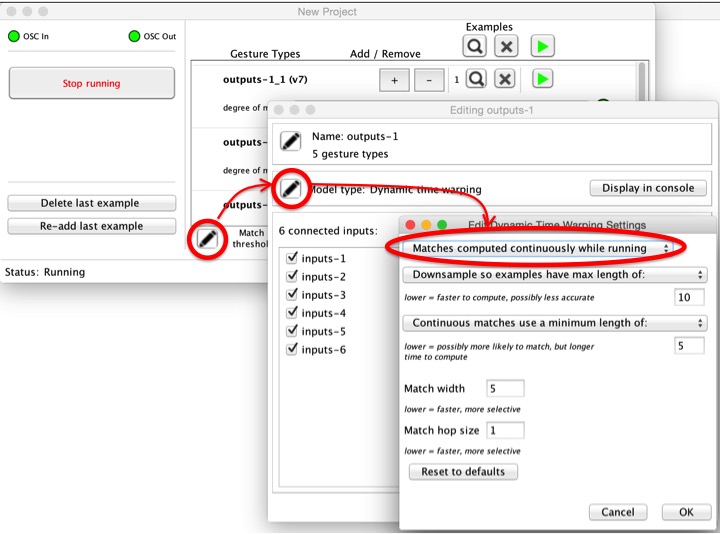
Customizing DTW’s behavior
You can edit the DTW modeling algorithm to customize it for your needs.
By default, DTW continuously looks at the input values and tries to match with your training examples. It therefore has to learn well not only how to distinguish one gesture from another, but also how to tell if any gesture has happened at all. If you already know when a gesture starts and stops (e.g., because someone presses a button for the duration of the gesture), you can tell DTW to only try to compute a match whenever a gesture is finished (i.e., whenever you hit “Stop running” or send an OSC message to Wekinator to stop running). Do this by hitting the “edit” button at the bottom of the screen, then “edit” the model type, then select “Matches computed only once running stops” from the top drop-down box. This will make DTW faster and probably also more accurate.
The other options in this settings menu might also help you tweak DTW’s performance to be faster and/or more accurate.
Integrating Wekinator into your own projects
Using your own inputs
To write your own input process, use any environment capable of sending OSC.
- It will need to send your inputs as a single OSC message, with each input sent as a float
- The number of floats in this message must always match the number of inputs Wekinator is expecting
- You can send input messages at any rate you want.
Using your own outputs
To write your own output process, use any environment capable of receiving OSC.
- It will need to listen for OSC messages from Wekinator
- Each message will contain a list of floats, one for each output
- Wekinator will compute these outputs every time it receives an input message, so changing the rate at which you send inputs will also affect the rate at which you receive outputs.
Wekinator’s default OSC messages
By default, Wekinator listens for its input messages on port 6448. The default input message is /wek/inputs and each input must be sent as a float within this message.
By default, Wekinator sends its output messages to port 12000 on localhost. The default output message is /wek/outputs and each output is sent as a float within this message, regardless of the type of output (classification, regression, DTW) used in Wekinator.
For classification outputs, you have the option of sending another OSC message containing the posterior probabilities for each class. This is turned off by default. To turn it on, click the model’s Edit button, then edit the name and type, and check the box to “Send class probabilities via OSC.” The OSC message name will be the same as the output name, with a “/” prepended (you will see a confirmation of this message name when you check this box).
When you use DTW, Wekinator will use your OSC output message name (by default, /wek/outputs) to send a continuous stream of match values, one per gesture, and each will be sent as a float. For instance, if you have 5 gestures being recognized, each time Wekinator receives an input message it will send out an output message with 5 floats: the first will be the distance to the closest example of gesture 1, the second will be the distance to the closest example of gesture 2, and so on.
When you use DTW, Wekinator will also send an OSC message specific to each gesture, whenever the distance to the closest example of that gesture is less than the threshold you have specified with the slider. (If more than one gesture have examples closer than the threshold, this message will be sent for only the closest gesture.) By default, these OSC message names are /output_1, /output_2, etc. View instructions about how to change these at Dynamic Time Warping in Wekinator.
Controlling Wekinator via OSC messages
You can send Wekinator OSC messages to control its behavior. (Ensure that “Enable OSC control of GUI” is checked in the Wekinator top-level Actions menu.) Send these messages to the same port where Wekinator is listening for input (6448 by default).
These are the control OSC messages supported:
- /wekinator/control/outputs (with list of floats): Send Wekinator current output values to populate the boxes/sliders on its GUI. Attach one float per output, in order.
- /wekinator/control/startRecording : Start recording examples (NOT used for dynamic time warping recording
- /wekinator/control/stopRecording : Stop recording examples (NOT used for dynamic time warping recording)
- /wekinator/control/startDtwRecording (with 1 int) : Start recording dynamic time warping examples for the gesture type given by the int (gesture types are indexed starting from 1)
- /wekinator/control/stopDtwRecording : Stop recording dynamic time warping examples (no int required)
- /wekinator/control/train : Train on current examples
- /wekinator/control/cancelTrain : Cancel current training (if it’s in progress)
- /wekinator/control/startRunning : Start running (if possible)
- /wekinator/control/stopRunning : Stop running (if currently running)
- /wekinator/control/deleteAllExamples : Delete all examples for all models
- /wekinator/control/deleteExamplesForOutput : Delete examples for a specified output, either for supervised learning (in which case this will delete examples of the specified model), or for dynamic time warping (in which case this will delete examples of the specified gesture class). Output indices start with 1.
- /wekinator/control/enableModelRunning (with list of ints): Enable running of all models whose indices are listed in the list of ints in the message. Model indices start with 1. This is equivalent to enabling the “play” button next to a model row.
- /wekinator/control/disableModelRunning (with list of ints): Disable running of models with these indices. This is equivalent to disabling the “play” button next to a model row.
- /wekinator/control/enableModelRecording (with list of ints): Enable recording of all models whose indices are listed in the list of ints in the message. Model indices start with 1. This is equivalent to enabling the “record” button next to a model row.
- /wekinator/control/disableModelRecording (with list of ints): Disable recording of models with these indices. This is equivalent to disabling the “record” button next to a model row.
- /wekinator/control/setInputNames (with list of strings) : Sets the names for all inputs. Also changes the number of inputs to match the size of this list of strings. Note: currently this only works if Wekinator is still on the setup screen.
- /wekinator/control/setOutputNames (with list of strings) : Sets the names for all outputs. Also changes the number of outputs to match the size of this list of strings. Note: currently this only works if Wekinator is still on the setup screen.
- /wekinator/control/selectInputsForOutput (with list of ints) : Selects which inputs are connected to a particular output (i.e., change feature selection).
- The first int in this message is the output number. Outputs are indexed starting with 1.
- The rest of the ints in this message are the indices of all inputs you want connected to this output. Any input not listed here is disconnected from the output. Inputs are indexed starting with 1.
Using the WekiInputHelper
The WekiInputHelper is a program that can help with basic processing of features. It sits between your feature extractor and Wekinator, and you can use it to do things like filtering, buffering, throttling, etc. Its instructions are here.